> ## Documentation Index
> Fetch the complete documentation index at: https://docs.riseworks.io/llms.txt
> Use this file to discover all available pages before exploring further.
# Getting API Access
> The two prerequisites for calling the Rise B2B API: your company enabled for the environment, and your wallet authorized on your RiseID.
Before your first authenticated call works, two separate things have to be true. They fail in different ways, so it helps to know both up front:
1. **Rise has enabled your company for the B2B API** in the environment you're calling. This is a per-company switch that only Rise can flip, and staging and production are enabled separately.
2. **Your API wallet is authorized on your RiseID**, meaning it holds an Owner, Payer, or Treasurer role. You set this up yourself in the app.
If either is missing you get a `403`, even when your credentials and code are correct. The two checks happen at different points in the flow:
```mermaid theme={null}
flowchart TD
A[SIWE handshake] --> C{Wallet holds an authorized
role on the RiseID?}
C -- No --> C1["403 · Wallet is not an authorized member
→ Authorize your API wallet"]
C -- Yes --> J[JWT issued]
J --> B["First scoped call
(payments, teams, balances, ...)"]
B --> G{Company enabled for the
B2B API in this environment?}
G -- No --> G1["403 · B2B_ACCESS_DENIED
→ Ask Rise to enable your company"]
G -- Yes --> D[Request succeeds]
```
The wallet-role check runs during the SIWE handshake, so a wrong or unauthorized wallet fails at login. Company enablement is checked later, on the first request that names a company or team, so an un-enabled company can still log in and read `/v2/me` but gets a `403` the moment it touches a team or payment.
## Enable your company for B2B API access
The B2B API is off by default. Turning it on for your company is a support request: reach Rise support through your dedicated Slack channel if you have one, the in-app chat, or [hello@riseworks.io](mailto:hello@riseworks.io). Include:
* Your company name and RiseID (or company nanoid, the `co-...` value).
* The environment you want enabled: **staging**, **production**, or both.
**Staging and production are enabled independently.** They run on separate databases, so enabling your company in staging does not enable it in production. Request each environment you plan to use. Most teams ask for staging first to build against, then production before going live.
Until this is done, calls that resolve to your company return:
```json theme={null}
{
"success": false,
"data": "Company is not enabled for B2B API access",
"error_code": "B2B_ACCESS_DENIED"
}
```
## Finding your RiseID
The SIWE handshake authenticates a **user**, so the `riseid` you send is your **personal (user) RiseID**, not a company or team RiseID and not your Rise Account address. Sending anything else returns `404 No entity found with riseid `.
To find it in the app:
Sign in to [app.riseworks.io](https://app.riseworks.io), open the user menu on the top bar (or the **Account** section of the left menu), and go to **My Profile**.
Under **Details**, copy the value in the **Rise ID** field. It's a 42-character address that starts with `0x`, for example `0x2DF5...b089`.
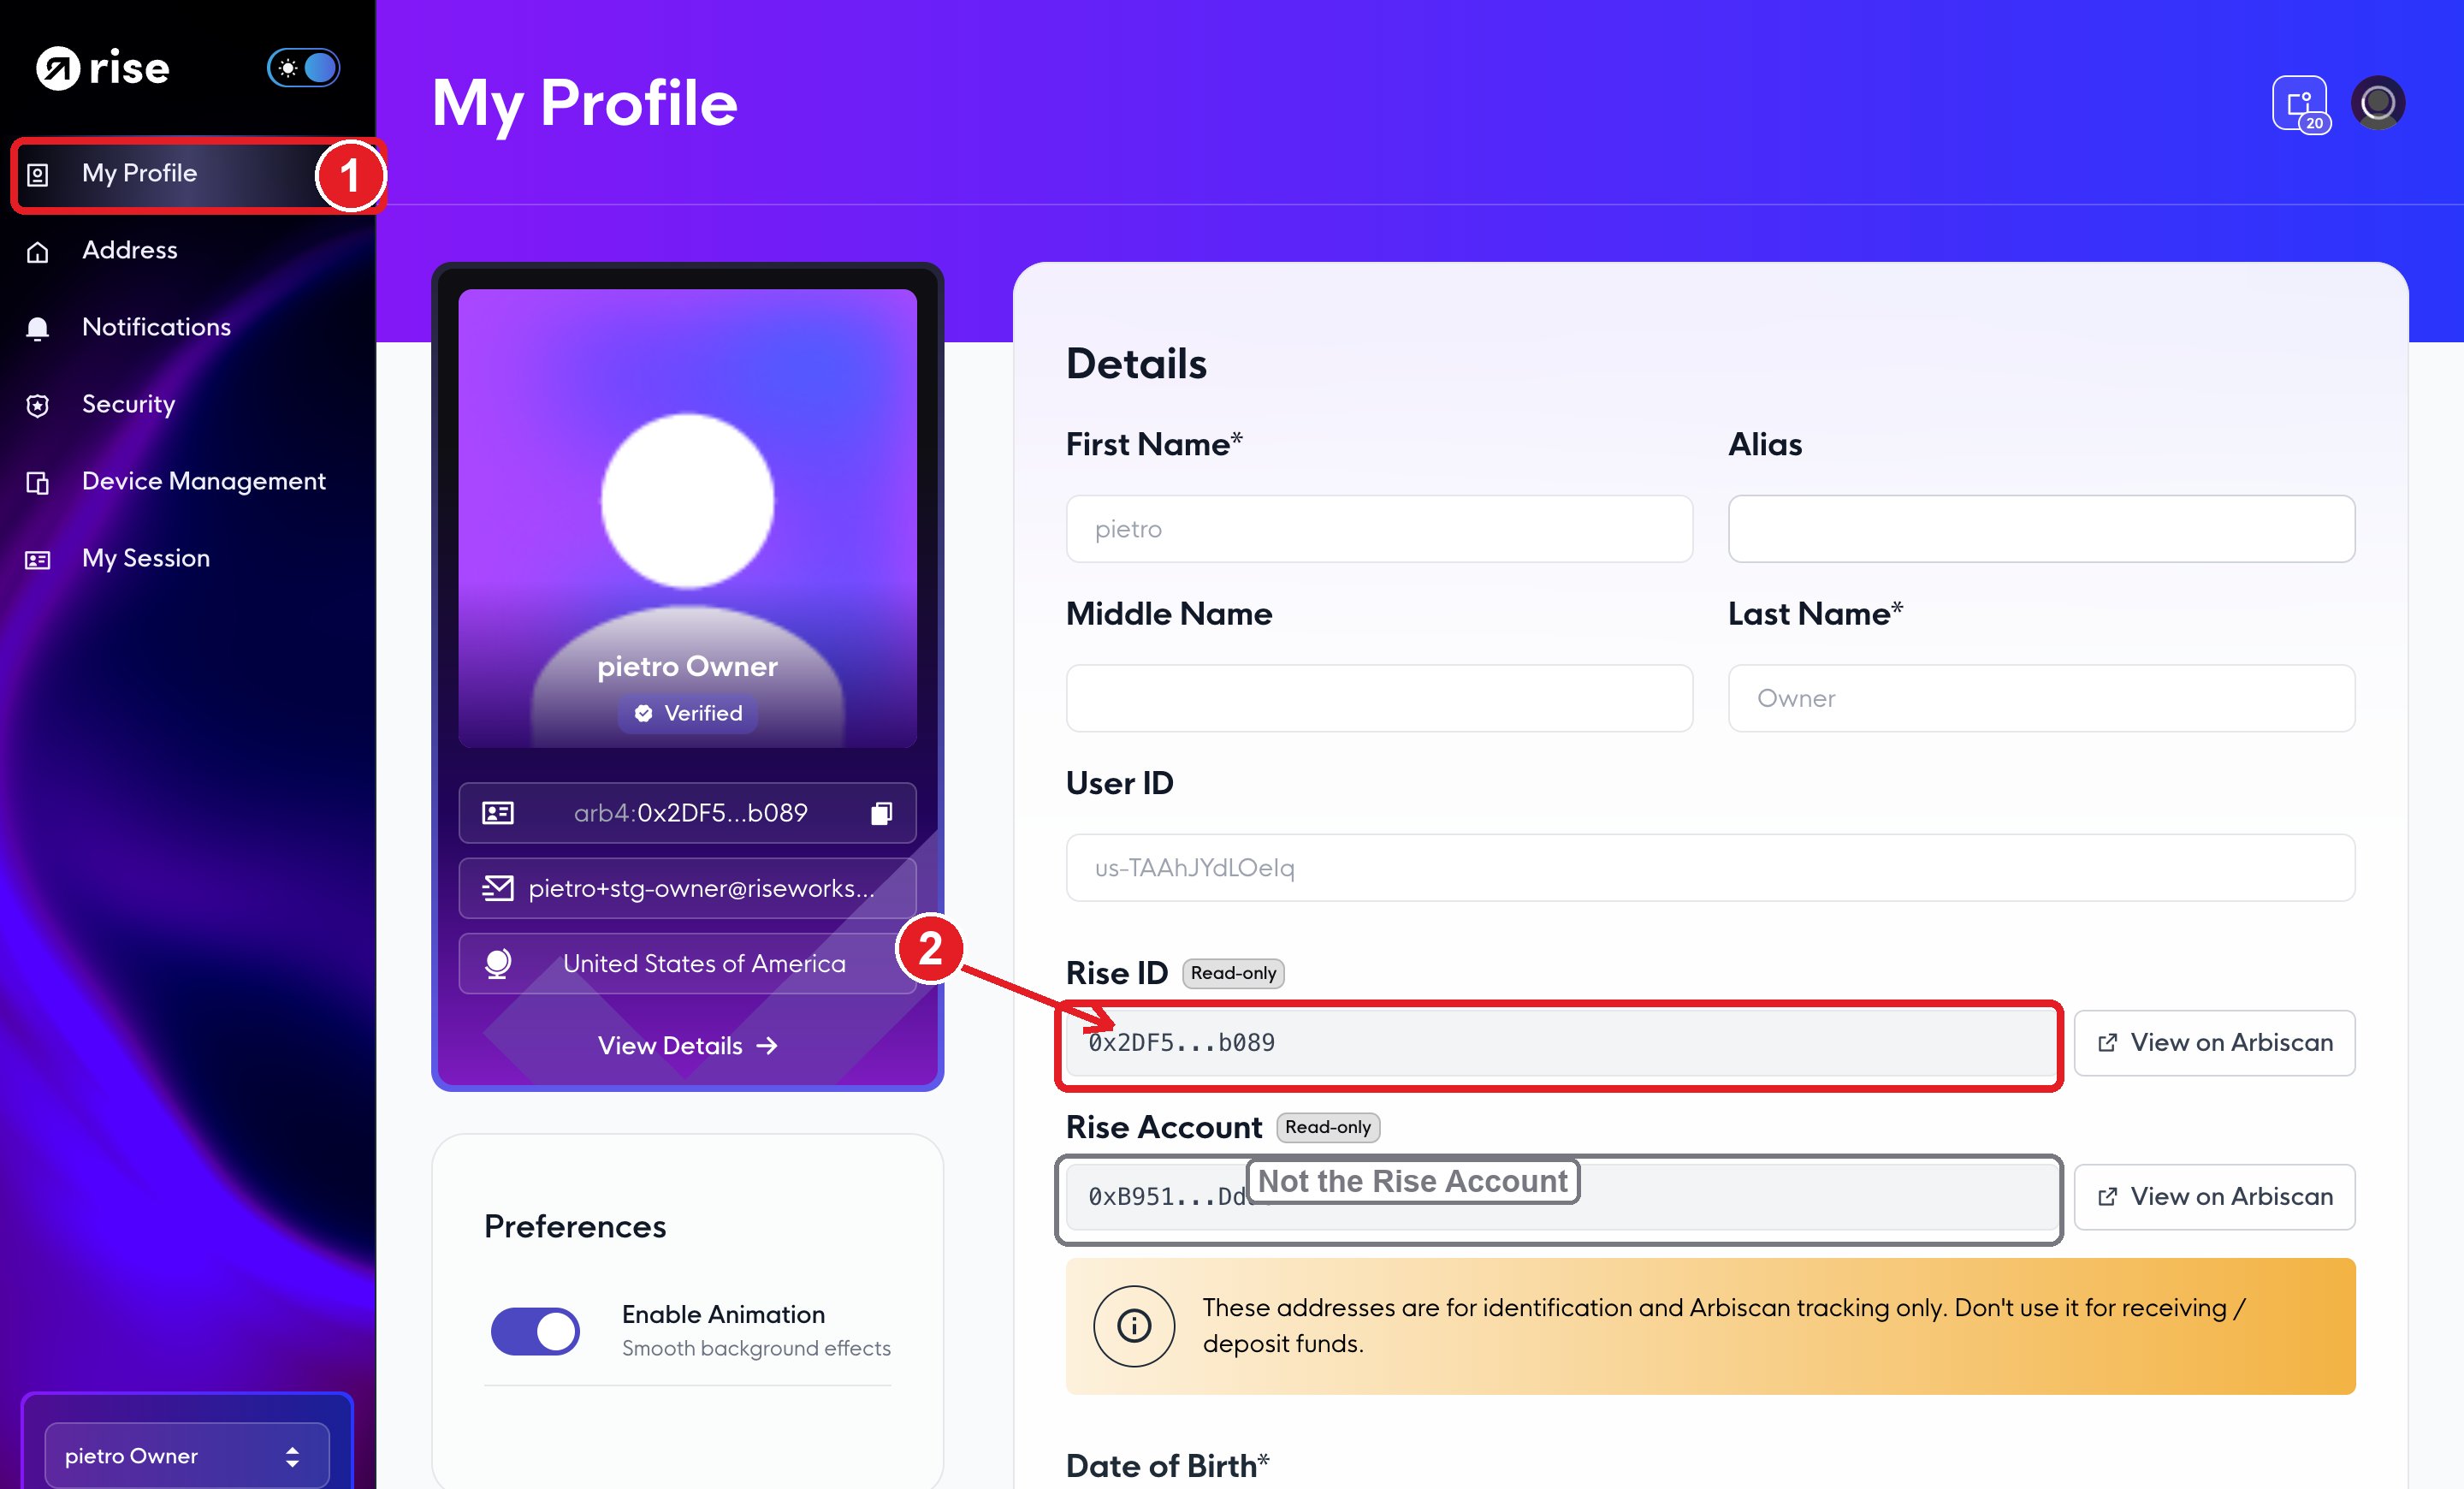 The same page shows a second address labelled **Rise Account**. That is not your RiseID and it won't authenticate. Use the field labelled **Rise ID**. Mixing the two up is a common cause of the `404` above.
**Send the bare `0x` address, with no prefix.** The Rise ID card in the sidebar shows the same value with a network prefix (`arb4:0x…`). Drop the `arb4:` (or `eth:` / `arb1:`) part, the API matches on the plain `0x…` shown in the **Rise ID** field. It is also not one of your `us-`, `co-`, or `te-` nanoids. A prefixed value or a nanoid is the single most common cause of `404 No entity found with riseid`.
Company and team RiseIDs are used for API operations like payments and balances, addressed by their `co-` / `te-` nanoids rather than by the SIWE handshake. See [RiseID](/concepts/riseid) for how the identity hierarchy fits together.
## Authorize your API wallet
The wallet you sign with has to be authorized on your personal RiseID before the handshake will hand you a JWT. Authorizing it in the app grants it the Owner role, which is one of the roles the B2B API accepts (Owner, Payer, and Treasurer all work).
The same page shows a second address labelled **Rise Account**. That is not your RiseID and it won't authenticate. Use the field labelled **Rise ID**. Mixing the two up is a common cause of the `404` above.
**Send the bare `0x` address, with no prefix.** The Rise ID card in the sidebar shows the same value with a network prefix (`arb4:0x…`). Drop the `arb4:` (or `eth:` / `arb1:`) part, the API matches on the plain `0x…` shown in the **Rise ID** field. It is also not one of your `us-`, `co-`, or `te-` nanoids. A prefixed value or a nanoid is the single most common cause of `404 No entity found with riseid`.
Company and team RiseIDs are used for API operations like payments and balances, addressed by their `co-` / `te-` nanoids rather than by the SIWE handshake. See [RiseID](/concepts/riseid) for how the identity hierarchy fits together.
## Authorize your API wallet
The wallet you sign with has to be authorized on your personal RiseID before the handshake will hand you a JWT. Authorizing it in the app grants it the Owner role, which is one of the roles the B2B API accepts (Owner, Payer, and Treasurer all work).
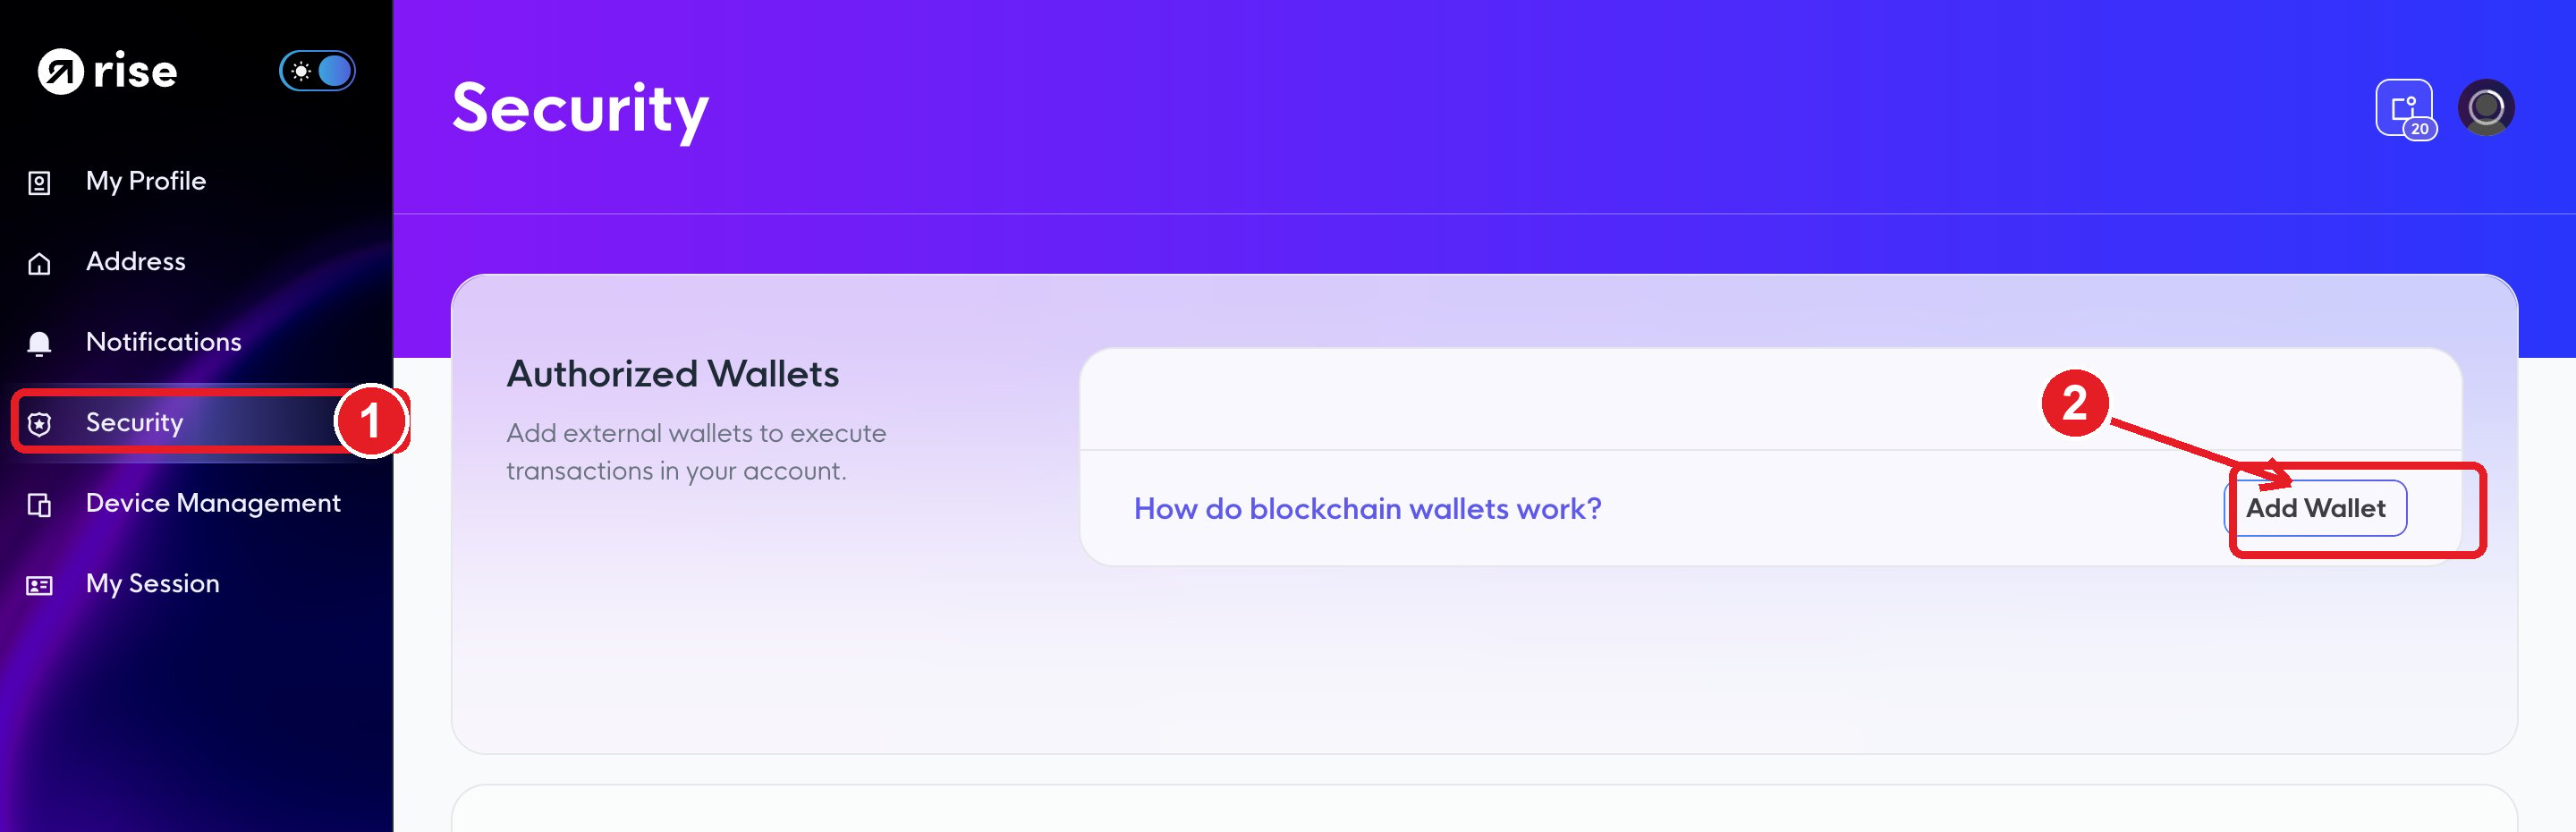 From the user menu or the **Account** section of the left menu, go to **Security** ([app.riseworks.io/account/security](https://app.riseworks.io/account/security)).
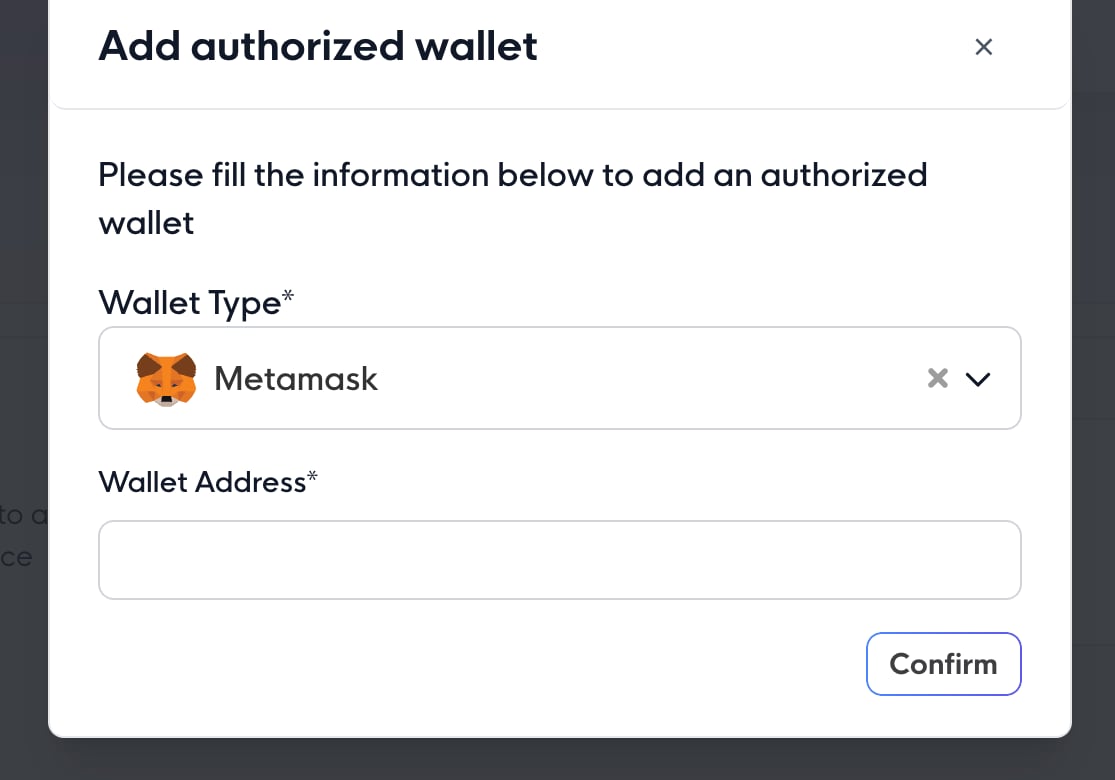
Under **Authorized Wallets**, click **Add Wallet**, choose the wallet type, paste the wallet's address, and confirm.
Sign the prompt with a wallet that is already authorized on your RiseID. This writes the new wallet's role on-chain.
Give the on-chain transaction time to confirm before you authenticate. Until it's mined, the SIWE handshake still sees the wallet as unauthorized and returns a `403`.
From the user menu or the **Account** section of the left menu, go to **Security** ([app.riseworks.io/account/security](https://app.riseworks.io/account/security)).
Under **Authorized Wallets**, click **Add Wallet**, choose the wallet type, paste the wallet's address, and confirm.
Sign the prompt with a wallet that is already authorized on your RiseID. This writes the new wallet's role on-chain.
Give the on-chain transaction time to confirm before you authenticate. Until it's mined, the SIWE handshake still sees the wallet as unauthorized and returns a `403`.
 **This wallet's private key can move money. Guard it accordingly.** The role you just granted is signing authority, not just a login. Anyone who holds the key can authenticate as you and sign payments and withdrawals for every team the wallet can reach, and Owner (the role the app grants here) can do everything the account can, including authorizing more wallets. Keep the key in a secret manager or HSM, never in code, a repo, a log, or anything client-side. If it ever leaks, remove the wallet under **Security → Authorized Wallets** straight away, which strips its on-chain role, then switch to a fresh one. A leaked key keeps working until you revoke it, unlike a JWT that expires in 24 hours.
Use a dedicated wallet for API operations rather than one holding funds. It needs no balance, since Rise pays the gas. See [Secondary Wallets](/authentication/secondary-wallets).
Until the wallet is authorized and confirmed on-chain, the handshake returns:
```
Wallet 0x... is not an authorized member of RiseID 0x.... Grant it an Owner, Payer, or Treasurer role and wait for the on-chain transaction to confirm before retrying.
```
Adding a wallet under **Security → Authorized Wallets** authorizes it on your personal RiseID, and that authority carries down to the companies and teams you own. If you'd rather scope a wallet to one team, switch to that team's workspace, open **Settings**, and use **Delegate Wallets → Add delegate** (name plus address). The app text there reads "Add delegate wallets to authorize API transactions."
Selecting a specific Payer or Treasurer role (rather than Owner) isn't exposed in the app yet. If you need a wallet scoped to one of those roles, ask Rise when you request access.
## Check you're set up
Once both prerequisites are in place, run the [authentication handshake](/authentication/authentication) and confirm a couple of calls:
* `GET /v2/me` returns your user. This proves the wallet is authorized and the JWT is valid.
* A scoped call like fetching a team or balance succeeds. That confirms your company is enabled for the environment.
If you're still blocked, match the response to the cause:
| Response | Cause | Fix |
| -------------------------------------------------------------- | ------------------------------------------------------------------------------------------------------- | --------------------------------------------------------------------------------- |
| `404 No entity found with riseid ` | The `riseid` has a network prefix (`arb4:`), is a `us-`/`co-`/`te-` nanoid, or is a company/team RiseID | Send the bare `0x` from the **Rise ID** field on My Profile, prefix stripped |
| `400 Wallet address is required` / `400 riseid is required` | `GET /v2/auth/siwe` was called without the `wallet` or `riseid` query param | Pass both: `/v2/auth/siwe?wallet=<0x>&riseid=<0x>` |
| `403 Wallet is not an authorized member...` | The signing wallet has no authorized role on the RiseID, or the grant hasn't confirmed on-chain yet | Authorize the wallet under Security, then wait for the transaction to confirm |
| `403 Company is not enabled for B2B API access` | Company not enabled for this environment | Ask Rise to enable it, and check you're pointed at the environment you requested |
| `401 Authentication required. Please provide Authorization...` | The JWT is missing or malformed on a call that needs it | Send `Authorization: Bearer ` from the handshake (the SDK does this for you) |
| `SIWE error: Signature does not match address...` | A different wallet signed than the one in the message, or the message was altered before signing | Sign the exact `data.siwe` string with the same wallet you passed as `wallet` |
The **Authorized Wallets** panel doesn't list wallets that already hold a role, so an empty panel doesn't mean the save failed. Confirm a wallet's role from the SIWE handshake succeeding, or by checking the RiseID on Arbiscan.
## Next steps
Run the SIWE handshake and get your JWT
Staging and production base URLs
How users, companies, and teams relate
Use a dedicated wallet for API operations
**This wallet's private key can move money. Guard it accordingly.** The role you just granted is signing authority, not just a login. Anyone who holds the key can authenticate as you and sign payments and withdrawals for every team the wallet can reach, and Owner (the role the app grants here) can do everything the account can, including authorizing more wallets. Keep the key in a secret manager or HSM, never in code, a repo, a log, or anything client-side. If it ever leaks, remove the wallet under **Security → Authorized Wallets** straight away, which strips its on-chain role, then switch to a fresh one. A leaked key keeps working until you revoke it, unlike a JWT that expires in 24 hours.
Use a dedicated wallet for API operations rather than one holding funds. It needs no balance, since Rise pays the gas. See [Secondary Wallets](/authentication/secondary-wallets).
Until the wallet is authorized and confirmed on-chain, the handshake returns:
```
Wallet 0x... is not an authorized member of RiseID 0x.... Grant it an Owner, Payer, or Treasurer role and wait for the on-chain transaction to confirm before retrying.
```
Adding a wallet under **Security → Authorized Wallets** authorizes it on your personal RiseID, and that authority carries down to the companies and teams you own. If you'd rather scope a wallet to one team, switch to that team's workspace, open **Settings**, and use **Delegate Wallets → Add delegate** (name plus address). The app text there reads "Add delegate wallets to authorize API transactions."
Selecting a specific Payer or Treasurer role (rather than Owner) isn't exposed in the app yet. If you need a wallet scoped to one of those roles, ask Rise when you request access.
## Check you're set up
Once both prerequisites are in place, run the [authentication handshake](/authentication/authentication) and confirm a couple of calls:
* `GET /v2/me` returns your user. This proves the wallet is authorized and the JWT is valid.
* A scoped call like fetching a team or balance succeeds. That confirms your company is enabled for the environment.
If you're still blocked, match the response to the cause:
| Response | Cause | Fix |
| -------------------------------------------------------------- | ------------------------------------------------------------------------------------------------------- | --------------------------------------------------------------------------------- |
| `404 No entity found with riseid ` | The `riseid` has a network prefix (`arb4:`), is a `us-`/`co-`/`te-` nanoid, or is a company/team RiseID | Send the bare `0x` from the **Rise ID** field on My Profile, prefix stripped |
| `400 Wallet address is required` / `400 riseid is required` | `GET /v2/auth/siwe` was called without the `wallet` or `riseid` query param | Pass both: `/v2/auth/siwe?wallet=<0x>&riseid=<0x>` |
| `403 Wallet is not an authorized member...` | The signing wallet has no authorized role on the RiseID, or the grant hasn't confirmed on-chain yet | Authorize the wallet under Security, then wait for the transaction to confirm |
| `403 Company is not enabled for B2B API access` | Company not enabled for this environment | Ask Rise to enable it, and check you're pointed at the environment you requested |
| `401 Authentication required. Please provide Authorization...` | The JWT is missing or malformed on a call that needs it | Send `Authorization: Bearer ` from the handshake (the SDK does this for you) |
| `SIWE error: Signature does not match address...` | A different wallet signed than the one in the message, or the message was altered before signing | Sign the exact `data.siwe` string with the same wallet you passed as `wallet` |
The **Authorized Wallets** panel doesn't list wallets that already hold a role, so an empty panel doesn't mean the save failed. Confirm a wallet's role from the SIWE handshake succeeding, or by checking the RiseID on Arbiscan.
## Next steps
Run the SIWE handshake and get your JWT
Staging and production base URLs
How users, companies, and teams relate
Use a dedicated wallet for API operations